Looking for an economical, easy, delicious way to feed the family? This meal cooks while you're doing other things and can be served many ways.
It's easy to prepare pulled pork roast for sandwiches or burritos. Slice off a 1 - 1 1/2 inch portion of the cooked roast and use two forks to shred the meat. Serve with shredded cheese, sour cream, diced tomatoes on a warmed tortilla or sandwich bun.
Choose a nice, lean sirloin tip pork roast like the ones from Costco priced about $16.00 for a 4-pack. Each roast makes a nice family meal for around $4.00. Use one fresh and freeze the other three for future meals. Add some rice, corn, potato or a salad and you've got a hearty meal.
Instructions:
Season the outside of the roast with garlic salt, paprika, black pepper or any dry rub or spices you like. Lightly brown the outside edges of the roast in a heated frying pan with some olive oil and minced garlic.
Brown the outside edges to seal in the flavor.
It only takes about a minute to brown the top and a minute on the bottom.
Use kitchen tongs to brown the sides and ends of the roast to seal in the flavors.
Use tongs to hold the roast and brown the edges.
Transfer the browned roast into the crock pot. Turn it on High. Add about 1/2 cup of water to the frying pan to make a seasoned liquid and pour it over the roast in the Crock Pot.
Cover and cook the roast on High for 5 to 6 hours. During the last hour reduce the heat to Low. Or cook the roast on Low for 7 to 8 hours while you're away.
Pulled pork burritos are a big hit with our family. Other times, this entree goes well with corn on the cob and a salad.
Pulled Pork Burrito with Corn on the Cob
Served on sandwich buns it makes a delicious barbecue pork sandwich. Or use cubed chunks of leftover pork roast to make pork fried rice. Easy, economical, and delicious, this meal will delight your family and fill your hearty appetite with very little effort.
Sometimes I crave something that reminds me of summer and childhood. Years ago, we made this recipe with Nabisco Vanilla Wafers and Instant Banana Pudding. These days, I prefer the taste of the homemade custard that takes only minutes to cook and the flavor alone makes up for the time invested. It's also easy cleanup as only one medium saucepan is needed. There are 5 main ingredients needed other than bananas and vanilla wafers. Most of these items I keep on hand in my pantry. Ingredients for the Custard
1/2 cup granulated sugar - or use 12 packets of Stevia sweetener or Sucralose
4 Tablespoons of powdered corn starch
1/4 cup of Karo corn syrup
2 egg yolks - It's easy to separate the yolks from the whites. See below.
2 cups of whole milk - You can also substitute 2% milk.
After the pudding thickens add:
1 Tablespoon butter
1 Tablespoon vanilla extract or sometimes I use banana extract if I have it.
To prepare the dish you'll need
Vanilla wafers and two bananas.
The key to making delicious pudding or custard is in the attention to stirring. Plan to dedicate 15 minutes of your undivided attention to this. Constant stirring eliminates the need for a double boiler and keeps the pudding from scorching and sticking to the pan. Instructions
Start with a heavy duty medium sized pan. Measure out the sugar or sweetener right into the cold pan. Add the corn starch and Karo syrup. Separate the egg whites from the yolks by using a knife to crack the egg or strike it gently on a the edge of the counter. Over a separate container, allow the egg white to drip through half of the shell. Pour the egg yolk into the pan with the dry ingredients.
Pour about half a cup of the milk into the ingredients and stir with a whisk to form a paste.
Add the remaining milk and cook over medium heat, stirring constantly.
Set a timer for about 20 minutes. Depending on your stove, it takes from 15 - 20 minutes for the mixture to come to a boil. At the first sign of boiling, remove the pan from the heat and add the pat of butter and vanilla extract. Stir and allow to cool a bit while you prepare the dish.
Line a casserole dish with a layer of Vanilla Wafers.
Slice the bananas over the wafers.
Pour the cooked pudding custard over the top.
End with another layer of bananas and finish with the custard. Sometimes I crumble a few Vanilla wafers over the top.
Chill in the refrigerator for at least two hours and serve with whipped cream. I hope you enjoy this family favorite dessert.
Trying to lose a few pounds at my age has become a real challenge. Two years ago I decided to lose ten pounds. I'm not discouraged. I've only got twenty more pounds to go. "All I had was a salad." Go figure.
This is a favorite with Iceberg lettuce, chopped Roma tomatoes, drained black beans and sliced fresh strawberries. Where I've been going wrong is with the dressing. If you read the label, two tablespoons is an average serving with 140 calories. I usually quadruple that amount. (I may be underestimating a bit.) This week I decided to try something different. I've been using Balsamic Vinaigrette mixed with Zesty Italian Lite dressing and I've lost two pounds.
This was lunch on Monday: Iceberg lettuce, chopped celery, sliced baby carrots, chopped beefsteak tomatoes and dressing. What's missing is the mountain of cheese that I usually shred over the top of this "low-fat" meal. Of course, I've skipped the Simply Dipped Nutty Buddy ice cream cone afterward, too. How droll.
For variety, I tried a salad with rolled up deli turkey, 15 calories per slice, and rather than the entire tomato, I used only half. What a sacrifice!
This one's also a favorite of mine made with baby spinach leaves, deli turkey and half of an avocado. I like to sprinkle a little lemon juice over the top to keep it from browning too quickly. Usually, there's no danger of that since it's gone in 60 seconds. Just kidding. It usually lasts three minutes while I watch an episode of Snapped: Killer Couples or Lt. Joe Kenda on TV.
Here's another way to use up that Costco-size Hillshire's Farm Deli Turkey in the economical five-gallon tub. I back-slid on this one and added shredded cheddar cheese, but to make up for it, there's fresh grapes. So I'm good, right?
Okay, here I'm really falling off the wagon with this tuna salad and its high calorie mayonnaise. Please help me, I'm falling. Down one pound and back up two. Aaaccck!
Getting better all the time with these added black olives, half a boiled egg, Garbanzo beans (for protein) and two rolled up slices of deli ham at 25 calories each. Oh, don't forget the Roma tomatoes and the half cup of Ranch Dressing.
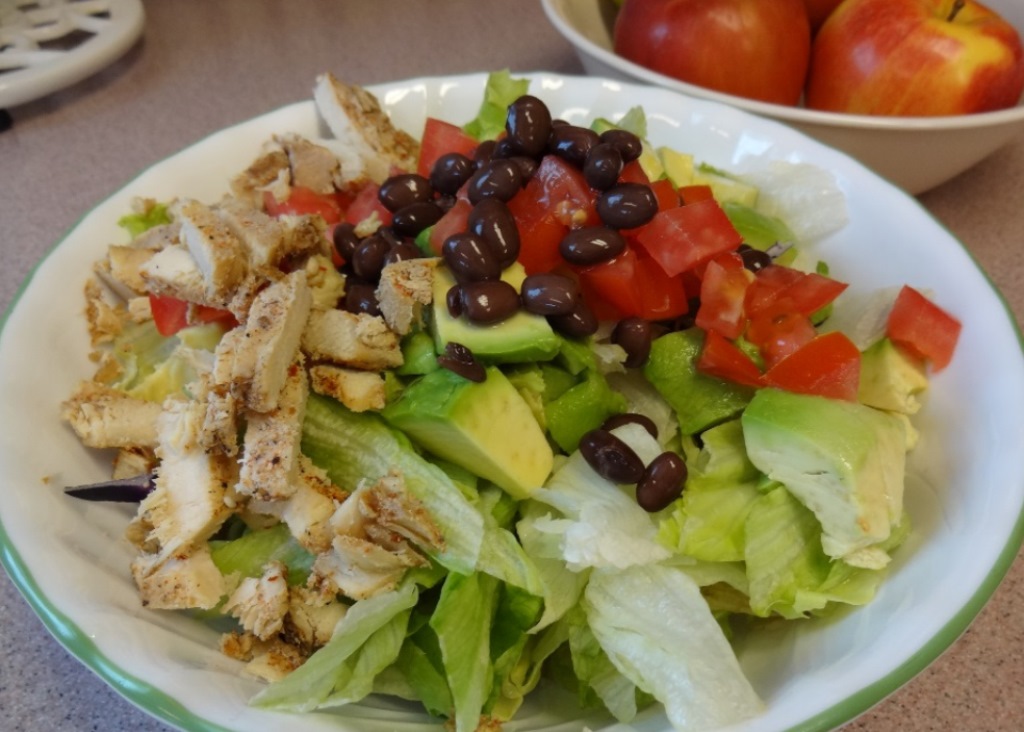
Now, you're cooking. Avocado, black beans, grilled chicken breast, Roma tomatoes over Iceberg lettuce. Yes, now, that's a meal in itself.
But wait, what about the dressing?
Venturing way out on a limb with Artisan type lettuce, otherwise, same stuff, different day. Black beans, Roma tomatoes, boiled egg, hold the salt - I'm on a diet. Ah, never mind. What good is an egg without salt?
This is even better. Tuna with no mayonnaise, sliced baby carrots, baby spinach, Iceberg lettuce, paprika. Uh oh. Giant bowl.
Really branching out now. Adding diced Bell pepper, rolled ham with Swiss cheese, boiled egg, Spinach and Iceberg lettuce. Feeling happy. Have a nice day. Ok. Google won't let me add more images so that's it for now. Eat healthy. Drum roll. Here's Paul Simon,
Once you taste the home made richness of this chocolate cream pie you'll never go back to instant pudding again. It's easy to make and well worth the time it takes.
Holidays were special times when our clan of cousins, aunts, uncles, siblings and parents gathered for a meal as a family. Preparations started before daylight for a full morning of cooking turkeys and baking cakes and pies.
When it grew close to the lunch hour, we would gather around in the Florida room, lured in by the delicious aromas which wafted into the back yard where we were playing. The festive table was set with platters of every sort of food imaginable from roasted turkey and gravy, mashed potatoes, fresh green beans, salads, cranberry sauce, casserole dishes, and of course, an entire table dedicated to dessert.
There was a variety of cakes and pies including mincemeat pie, pecan and strawberry, but the chocolate cream pie was always my favorite and usually the first one to disappear. Thoughts of those times bring fond memories of those pies made from scratch by someone we love.
It's not hard to duplicate this homemade pie, whether using a store-bought crust or making your own. Cooking the filling takes about twenty-five minutes, during which you can bake the single pie crust and let it cool. Here's how to do it:
Pie Crust Dough Recipe for a One Crust Pie
1 cup sifted all-purpose flour; 1/3 cup of solid vegetable shortening (like Crisco) or butter; 1/4 teaspoon salt and 2-3 tablespoons of cold water.
Sift the flour and salt together into a mixing bowl. Using two knives (in crisscross fashion) or a pastry cutter, cut in the shortening until the mixture looks like cornmeal. Slowly add the cold water, a little at a time, until the dough sticks together in a ball but is not sticky. More water or flour may be needed if the mix is too dry (add drops of water) or too sticky (add a little flour).
If you have time, refrigerate the dough for about an hour. This is usually not needed if the room temp is cool.
Transfer the dough ball to a lightly floured surface and roll it into a circle one inch larger than the pan to allow for a fluted edge. I made a video for Instructions on forming the pie crust:
Place the prepared dough into a deep-dish, 9 inch pie pan.
Trim and fold under the excess edges of the dough as you work your way around the rim.
Shape the edges into scallops by pressing the dough between two fingers and forming an indentation between them with the thumb of the other hand.
Make sure there are no cracks or tears in the uncooked crust. If repair is needed, a drop of water or milk will help mending the cracks.
Since the pie crust must be baked before adding the pudding, use a fork to prick tiny holes all around the edges and bottom of the crust. This allows steam to escape when baking.
Bake the crust at 450 degrees for 10 minutes or until golden brown. Cool completely on a wire rack before filling.
Ingredients and Instructions for the Chocolate Cream Pudding filling:
Ingredients: 2 cups of milk (regular or two percent), 1/4 cup of Corn Syrup, 4 Tablespoons of Corn Starch, 1/2 cup granulated sugar, 2 egg yolks, 4 Tablespoons Hershey's powdered cocoa, 1 Tablespoon butter, 1 teaspoon Vanilla extract.
Mix together about a half cup of the milk, all the sugar, corn syrup, cornstarch and cocoa in a medium sized, heavy-duty saucepan.
Separate the egg yolks from the egg whites and add the yolks to the mixture and stir thoroughly with a whisk.
Add the rest of the milk and heat the mixture slowly over low to medium heat stirring constantly so it doesn't scorch. It may take between 11 and 15 minutes to reach a boil.
When the mixture comes to a boil and starts to thicken, immediately remove it from the heat and add the butter and vanilla extract stirring until the butter melts.
Let the mixture cool before spooning it into the cooled, baked pie crust.
Refrigerate the pie for at least an hour before serving.
Tips
Be sure to watch the milk mixture carefully as it comes up to temperature and stir continuously.
Resist the temptation to raise the heat too high. Medium heat is best to avoid scorching the milk and sugar.
When the hot mixture starts bubbling up unexpectedly, take the pan off the heat.
Allow the pudding to cool completely before pouring it into the crust. This helps keep the crust from getting soggy.
If the pastry puffs up in places when baking, use a fork to prick the bubble and release the steam or the crust will bake in the raised shape.
Making homemade whipped cream is quick, easy and delicious. Or, if you like, you can use a prepared topping like Cool Whip or Ready Whip Whipped Cream.
This family recipe is one of my husband's all-time, most requested desserts.
This tasty pumpkin bread comes out more like a subtle spice cake than bread.
You can use pumpkin puree from the jack-o-lantern that sat on your front porch during October. But if you don't have any fresh, it's okay. Canned pumpkin turns out great. Be sure to use plain canned pumpkin, not the pumpkin pie mix.
There are no special tricks or experience needed to make this bread. I baked it for the first time this weekend and it was wonderful. Here's the recipe. Preheat the oven to 350 degrees.
In a large mixing bowl combine the dry ingredients:
2 1/4 cups all purpose flour
1 cup granulated sugar
1/2 cup brown sugar
1 1/2 teaspoons baking soda
1 1/2 teaspoons baking powder
1 1/2 teaspoons cinnamon
1/4 teaspoon ginger
1/4 teaspoon ground cloves or allspice
1/2 teaspoon salt
Add:
3 large eggs
1 can pumpkin (15 oz.) or 1 1/2 cups puree
1 cup plus 2 Tablespoons vegetable oil
1 teaspoon vanilla extract
1/2 cup milk (or water)
1 cup chopped pecans or walnuts (optional)
Mix thoroughly and pour into two generously greased 8 inch bread pans.
Bake for one hour at 350 degrees. Mine was done in 57 minutes since my oven runs hot.
Cool in the pan for ten minutes before transferring to a cake rack.
I wrapped each loaf in Glad Press 'n Seal wrap, then a layer of wax paper. For the second loaf, once it was completely cool, I wrapped it again in aluminum foil and put it in the freezer.
Sunday afternoon we enjoyed a nice hot cup of tea with a thick slice of Pumpkin Bread. It was yummy!
The recipe makes two loaves making this ideal for sharing.
With the possibility of our first ninety degree day of the year, I decided to bake cookies in the cool of the morning. Of all the recipes I've tried that include oatmeal, this one is my favorite. It comes from my old Farmersville Garden Club Cookbook published in 1994.
The book is full of amazing food ideas, recipes, emergency substitutions and household cleaning tips. This recipe came from Mary Pope.
The recipes remind me of pot luck dinners and social gatherings where families would bring their favorite casseroles and desserts tightly covered in aluminum foil, ready to peel off and share.
The ingredients are simple, the prep time is quick and the results are delicious.
Ingredients:
1 Cup plus 2 Tbsp. Unsifted All Purpose Flour
1 Cup Quick Cooking Oatmeal (Not instant)
2 Tbsp. Unsweetened Cocoa
3/4 tsp. Baking Soda
3/4 Cup (1 1/2 Sticks) Butter or Margarine softened
1/2 Cup Granulated Sugar
1/2 Cup Firmly Packed Light Brown Sugar
1 Egg
1 tsp. Vanilla Extract
1 6 oz. Package Semi-sweet Chocolate Chips
1/2 Cup Chopped Walnuts or Pecans (Optional)
Preheat the oven to 350 degrees.
Stir together the flour, baking soda and cocoa in a small bowl.
Beat together the butter, granulated sugar and brown sugar until it's light and fluffy.
Add the egg and vanilla extract.
Add the flour mixture and blend at a low speed until combined.
Hand stir in the oatmeal, the chocolate chips and the chopped nuts.
Drop by rounded teaspoonfuls onto greased baking sheets and bake for ten (10) minutes.
I like to use two cookie sheets and prep the second one while the first one is baking.
Remove the cookies from the oven and leave them on the warm baking sheet for about three (3) minutes before transferring onto a wire rack to cool.
This recipe makes about four (4) dozen cookies.
To change it a bit, I deleted the nuts, substituted two (2) sticks of butter and added a couple of Tablespoons of additional flour rather than grease the cookie sheets. The cookies come out firm and round and disappear quickly.
All week I've been eating salads for lunch. This one started out with a bed of organic baby spinach and Iceberg lettuce.
Then sliced strawberries were added along with strips of orange bell pepper.
Then I added a diced Roma tomato and some Garbanzo beans. I like to open a can and run cold water over the contents to drain the beans. I use the lid as a strainer or sometimes break out my colander. Then, transfer the washed beans to a covered container for use during the week. I do the same thing with organic black beans.
To top the salad off I added a boiled egg and served it with Raspberry Vinaigrette dressing.
Baby Spinach leaves and a sliced strawberry
Strips of orange bell pepper and Garbanzo beans for protein
Diced Roma tomato
Topped off with a small amount of shredded Queso Quesadilla cheese and a boiled egg, this was truly a filling lunch.
It just wouldn't be July without a watermelon cooling in the fridge. Of course, the fourth of July has passed and soon August will be in full swing so this seedless watermelon will probably be the last one I cut and cube this season. I've discovered a way to prepare the melon that is easy for me and makes the fruit disappear quickly. Here it is in picture form.


